Building the Trap
This brief guide assumes working knowledge of your tools and basic safety practices. It does not cover specific cutting techniques or how to operate equipment.
Cut and drill
-
Break down the plywood using the cutlist. Label each piece as you go to make assembly easier. Plan your cuts so each pass runs the full length of the stock, then subdivide from there until every piece is broken out.
-
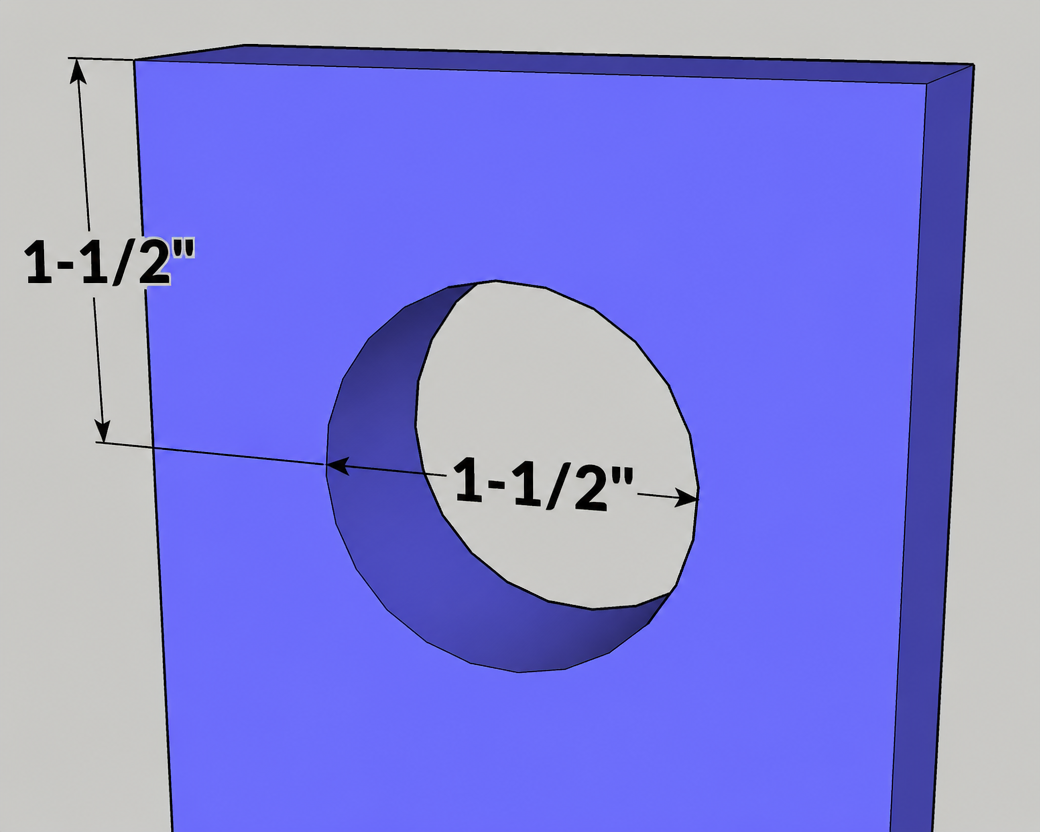
Drill the entrance hole and hanging hole. Use a 1-1/2″ Ø hole saw or Forstner bit. Center the entrance hole 1-5/8″ from the middle edge of the Front panel, and the hanging hole 1-1/2″ from the edge of the Hook.
Assemble the box
- Using 1″ hardware and wood glue, join the bottom, back, front, sides, and cleats. Note that the sides stop short of the top edge — that gap forms the inner lip the frames will hang from.
- Attach the Hook to the back of the box. Once the trap is hung, this joint carries the entire load, so it deserves extra attention: spread glue across the full mating face, and use 5/8″ hardware generously.
- Assemble the lid using 5/8″ hardware and wood glue.
- Allow all glued joints to fully cure before handling further.
- Optionally paint the exterior. Do not paint the interior — bees will reject residual paint odor, and bare wood absorbs propolis and beeswax over time, which only makes the trap more attractive.
Prepare for deployment
- Load three used frames into the cavity. If you have access to an old brood frame from a healthy colony, include it — the residual scent is one of the strongest attractants available. The trap is sized for five frames, but loading only three leaves enough open volume for scout bees to register the cavity as a viable home.
- Apply lure. A small amount of lemongrass oil or commercial swarm lure near the entrance and along the upper interior is plenty. Rubbing beeswax or propolis inside the box adds further scent. Use a light touch — over-scenting is worse than under-scenting.
- Secure the lid. A loose lid won't stay put once the trap is in a tree. Options: a small latch (if you're using thinner stock, look for a 90-degree corner latch), a ratchet strap wrapped around the whole box, or even a rock or brick set on top. Pick whatever fits your setup and budget.
- Hang the trap 10–15 ft up a tree using the Hook. A J-hook will work in a pinch, but a washer and lag bolt is the more secure setup. Alternatively, skip the Hook entirely and ratchet-strap the trap directly to the trunk, with the strap riding immediately beneath the cleats.
Tips
- Mark your factory edges. On a fresh sheet of plywood, run a wax lumber crayon or pencil along the factory edges. Always run those edges against your table saw fence — they're the truest reference you have, and using them minimizes cumulative error across cuts.
- Stick with untreated stock. A swarm trap only houses bees for the short window between catch and transfer to a nuc or hive, but even so, treated lumber and plywood can harm the colony. Use untreated plywood or solid wood.
- Pre-drill for thinner stock. Pilot holes prevent splitting when driving fasteners near edges or into thin pieces.
- Refresh the lure every 2–3 weeks through swarm season to keep the scent active.